Nucleum Guide
Table Of Contents
1. Introduction

Nucleum is a VST instrument plugin that can be used in VST host applications on the Windows platform. Nucleum is developed by Zynewave and is released as freeware. Please visit zynewave.com to check for software updates.
The synthesis technique used in Nucleum is a combination of subtractive synthesis and frequency modulation (FM) synthesis. Both synthesis techniques use oscillators as sound generators. Subtractive synthesis is based on filtering out unwanted frequencies generated by an oscillator waveform. FM synthesis is based on using the output of an oscillator to modulate the phase of the waveform generated by another oscillator.
Read more about subtractive and FM synthesis:
https://en.wikipedia.org/wiki/Subtractive_synthesis
https://en.wikipedia.org/wiki/FM_synthesis
1.1. Preset Management
![]()
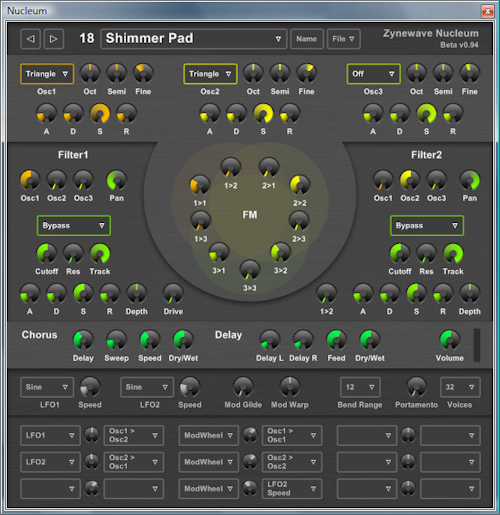
Preset management controls are located at the top of the editor window. Nucleum contains a bank of 128 programs. Each program stores a snapshot of all the parameters in the editor. You can select a program using the two arrow buttons or the program popup menu. You can also change programs using MIDI program change messages. Press the Name button to rename the current program.
With the File menu you can load and save the current program or the entire bank. Nucleum preset files are saved as .txt files. Note that this is a different format than the .fxp or .fxb files you can save from your VST host application.
1.2. Parameter Editing
There are two kinds of parameter controls in the Nucleum editor. Option parameters are edited with a popup menu control. Value parameters are edited with a dial control.
When you click on a dial the parameter name label below the dial is replaced with a numeric readout of the parameter value, until you release the mouse. You edit the parameter value by dragging the mouse up or down. You can fine adjust the value by holding the shift key. High resolution parameters show an extra decimal in the value readout when you are fine adjusting. Holding the control key when clicking the dial resets the parameter to its default value.
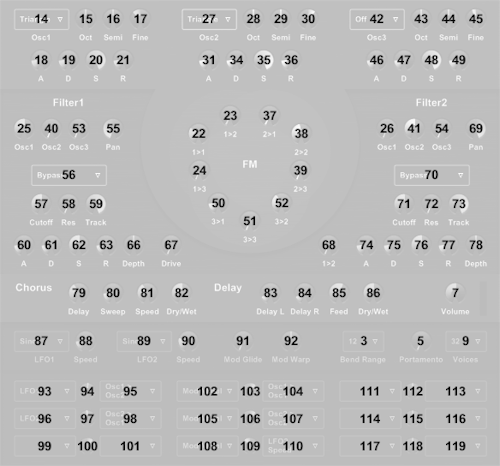
The parameters can also be edited with MIDI Control Change (CC) messages. At the end of this guide is a chart showing the CC numbers that are assigned to each parameter.
2. Oscillators

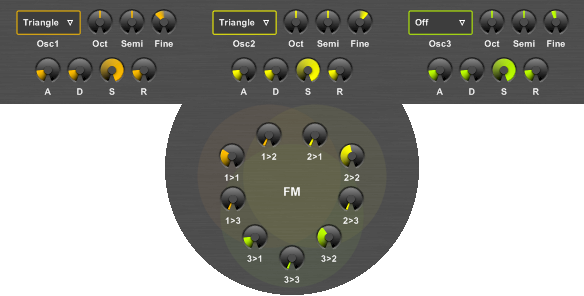
Nucleum has three oscillators. For each oscillator you can select the waveform type and the tuning in octaves, semitones and fine resolution. The available waveform settings are: Off, Sine, Saw, Triangle, Square and Noise. FM synthesis traditionally uses sine waveforms but Nucleum allows you to use any of the waveforms with FM.
2.1. Amplitude Envelopes
Each oscillator has its own amplitude envelope. In Nucleum you define an envelope by specifiying an attack time, decay time, sustain level, and release time (ADSR). During the attack time the envelope rises from zero to maximum level. During the decay time the level decreases to the sustain level. The sustain level is maintained as long as the note is held. When the note is released the level fades to zero during the release time.
Read more about ADSR envelopes:
https://en.wikipedia.org/wiki/ADSR_envelope
2.2. Frequency Modulation
The nine dials placed in a circle at the center of the editor controls the FM routing between the three oscillators. Each oscillator has three dials that controls how much of the oscillator output is routed back as phase modulation of the three oscillators. Each oscillator can thus be set to self modulate as well as modulate the two neighboring oscillators. Setting all dials to zero disables FM.
3. Filters

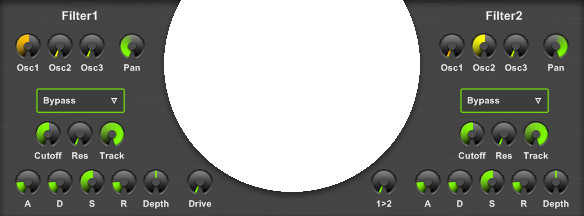
The output of the three oscillators can be mixed into two filter effects. The level of each oscillator output is set with the Osc1, Osc2 and Osc3 dials at the top. If you use an oscillator purely as a modulator in an FM sound, you can set the output of the oscillator to zero to avoid that it gets mixed in with the sound.
The available filter type settings are: Bypass, Low Pass, High Pass, Band Pass, Band Reject and Peaking. The type names refer to what frequencies remain after the filter processing. Setting the filter type to Bypass turns off the filter processing but the sound is still routed through the effect.
The Cutoff dial controls the cutoff frequency of the filter processing.
The Resonance dial sets the amount of boost that is applied at the cutoff frequency.
The Tracking dial sets the ratio at which the cutoff frequency is scaled to the note pitch. When set to zero the cutoff frequency remains the same no matter which note is played.
Read more about filters:
https://en.wikipedia.org/wiki/Voltage-controlled_filter
3.1. Filter Envelopes
Each filter has an envelope that modulates the filter cutoff. The filter envelope is defined by the same type of parameters that define the amplitude envelope. In addition to the ADSR controls there is a Depth dial that sets the amount of modulation applied to the cutoff. When the depth is set to zero the envelope has no effect. Increasing the depth increases the range that the cutoff is modulated. Setting a negative depth value inverts the envelope causing the cutoff to modulate towards lower frequencies.
In addition to modulating the filter cutoff, the filter envelopes can also be used as modulator sources in the modulation matrix, which is explained later in this guide. This is most useful if the filter is bypassed.
3.2. Overdrive
The overdrive effect can be used to add "growl" to a sound. The overdrive effect is placed in the Filter1 section because it is applied immediately after the Filter1 processing but before the serial routing into Filter2. Thus you can filter the sound both before and after overdrive is applied. Bypassing Filter1 will not bypass the overdrive effect. Setting the Drive dial to zero disables the overdrive effect.
Read more about the overdrive effect:
https://en.wikipedia.org/wiki/Overdrive_(music)
3.3. Fil1 > Fil2
The Fil1 > Fil2 dial sets how much of the Filter1 output is routed into Filter2. Increasing the amount that is routed into Filter2 will decrease the amount that is output into the master stereo chain. When the dial is set to zero the two filters work in parallel. When the dial is set to maximum the entire Filter1 output is routed into Filter2.
3.4. Panning
The oscillators and filters all process mono signals. The two Pan dials control the panning of the filter outputs as they are mixed into the master stereo chain. Note that if you have set the Fil1 > Fil2 dial to maximum, the Filter1 Pan dial has no effect since the entire Filter1 output is routed into Filter2.
4. Effects

The master stereo chain contains optional chorus and delay effects. The final Volume dial controls the master output level of the plugin. The level meter placed next to the volume dial flashes red when the output level is overloaded. This overload can produce a harsh sound, so you should keep an eye on the level meter and reduce the volume if you notice any overload.
4.1. Chorus
The chorus effect mixes the original signal with a delayed signal where the delay time is modulated by a sine LFO. The Delay dial sets the minimum delay time. The Sweep dial sets the range of time that is added by the modulating sine wave. The Speed dial sets the frequency of the sine LFO.
The Dry/Wet dial sets the mix ratio of the unprocessed (dry) signal with the delayed (wet) signal. Setting the Dry/Wet dial to 0.5 mixes half of each, which is the typical ratio of a chorus effect. Setting the Dry/Wet dial to zero turns off the chorus effect.
Note that since the chorus effect is a master effect that is running continuously, the sound of a playing note may vary depending on where the chorus modulation is when the note is started. Thus the chorus effect may not be suitable for some types of percussive sounds.
Read more about the chorus effect:
https://en.wikipedia.org/wiki/Chorus_effect
4.2. Delay
The delay effect is a stereo ping-pong delay. The left and right channels of the stereo signal are delayed separately, and the feedback of each channel delay is sent to the opposite channel.
The Delay dials are split into two ranges. The first half sets the delay time from 0 to 1 second. The second half selects between note divisions that are synced to the current tempo of the VST host application. The choices range from 1/64 to 1/1, with triplet and dotted options.
The Feedback dial controls how much of the delayed signal is sent back into the delay effect. Setting the feedback to zero causes the delay effect to only output one delay. The delayed signals are slightly lowpass filtered to create a more natural sounding decay.
The Dry/Wet dial sets the mix ratio of the unprocessed (dry) signal with the delayed (wet) signal. Setting the Dry/Wet dial to 0.5 mixes half of each, meaning the level of the delay signal (before feedback) is the same as the level of the dry signal. Setting the Dry/Wet dial to zero turns off the delay effect.
Read more about the delay effect:
https://en.wikipedia.org/wiki/Delay_(audio_effect)
5. Modulation

The bottom of the Nucleum editor contains modulation settings. There are controls for various modulators and voice settings and a modulation matrix where you connect modulators to modulatable parameters.
5.1. LFO
Nucleum has two Low Frequency Oscillators (LFO). They resemble the normal oscillators in their waveform options, but instead of generating audible sound they oscillate at a much lower frequency and their output is used to modulate other parameters.
The Speed dial is split into two ranges. The first half sets the speed from 0 to 20 Hertz. The second half selects between note divisions that are synced to the current tempo of the VST host application. The choices range from 1/64 to 4/1, with triplet and dotted options.
Read more about LFO:
https://en.wikipedia.org/wiki/Low-frequency_oscillation
5.2. Mod Glide
The Mod Glide effect takes a modulator input value and outputs a value that gradually glides from the previous input value towards the new input value. The glide time is set by the Mod Glide dial. The effect can be used to smoothen sharp edges of another modulator and with longer glide times it can be used to create a slower responding curve of for example an LFO output.
5.3. Mod Warp
The Mod Warp effect defines a curve that can be used to remap a modulator input value. The Mod Warp dial sets the output value of the point on the curve where the input value is 0.5. Setting the Mod Warp to the default value of 0.5 creates a linear curve that does not change the value.
A typical use of the Mod Warp effect would be to set up a non-linear note velocity response curve. Instead of routing Velocity directly to the target parameter in the matrix, you route Velocity into the Mod Warp, and then route Mod Warp into the target parameter. Adjusting the Mod Warp dial then controls how note velocity affects the target parameter.
5.4. Voice Settings
The Bend Range option sets how many semitones the pitch bend wheel on keyboard controllers will bend the pitch of the oscillators.
The Portamento dial sets the time it takes for the pitch to glide from the previously held note to the new note played. Portamento is mainly intended for monophonic presets since portamento behaviour can be difficult to control with polyphonic voices. Setting the dial to zero disables portamento.
The Voices option sets the maximum number of simultaneously playing voices. Monophonic voice (1 voice) can be set to either Mono Hold or Mono Retrig. The hold option allows for legato play, as it will skip the attack/decay stage of the envelopes if a new note is played before the previous note is released. If the maximum number of simultaneously playing voices has been reached, Nucleum will steal the voice of the oldest playing note when it starts playing a new note.
5.5. Modulation Matrix
The modulation matrix is where you connect modulator sources to modulatable target parameters. There are nine available source/target slots each with a Depth dial that controls the amount of modulation.
Most of the modulator sources provides values from 0 to +1. The LFOs provides values from -1 to +1. The Depth dial can be set from -1 to +1. The depth value is multiplied with the modulator source value before the resultant modulation value is applied to the target parameter.
The modulation value is applied to the target parameter by simulating an offset of the parameter dial. For example, if the parameter dial is set to its minimum position, then a modulation value of +1 results in a parameter value as if the dial is set to its maximum position. A negative modulation value simulates an offset of the dial in the opposite direction.
An exception to this rule are the LFO speed and envelope AD Time parameters. Modulation of these parameters are applied directly on the parameter value instead of the dial positions. Modulation of the LFO speed adds a linearly scaled value from 0 to 20 Hertz. Modulation of AD Time parameters scales the time so that a modulation value of -1 results in a time of zero and a modulation value of +1 results in double the time.
You can select the same modulator source in multiple slots and you can select the same target parameter in multiple slots. If you route multiple sources to the same target, the output of the modulator sources are added together before being applied to the target parameter. If you want to multiply two modulator sources instead of adding them, you can use a modulation bus.
5.6. Modulation Busses
Nucleum has two modulation busses. Each bus has two inputs labeled Send and Multiplier. The bus output is the Send input multiplied with the Multiplier input. If there are no sources routed to the Multiplier input of a bus, the Send input is routed straight to the output.
For example: Route an LFO into Bus1 Send. Route a filter envelope into Bus1 Multiplier. Route Bus1 output to a target parameter. The resultant modulation is an LFO output shaped by the filter envelope.
6. Reducing CPU Usage
The Nucleum CPU usage can be reduced by making sure that unused effects are turned off. You can also consider turning off effects if they only have a minimal impact on the sound.
The following is a list of settings that can help reduce CPU usage:
- Set the waveform type of unused oscillators to Off.
- Set all nine FM dials to zero if FM synthesis is not used.
- Set the Dry/Wet dials of the chorus and delay effects to zero.
- Set the filter type to Bypass.
- Set the Drive dial to zero.
- Set the Portamento dial to zero.
- Remove unused source and target parameters in the modulation matrix.
- Reduce the Voices option to set an upper limit for the CPU usage.
Another note about the Nucleum CPU usage: The plugin processing uses SSE instructions to speed up the processing of multiple voices. SSE instructions can process 4 voices simultaneously so you may notice that CPU usage only increases for every fourth note added to the currently playing voices.
7. MIDI CC Chart
This chart shows the MIDI control change numbers that are assigned to each parameter:

